Showing posts with label Kids Crafts. Show all posts

Thursday, June 11, 2015

Reptile Swamp Birthday Party

So I have decided that I have been a very bad blogger, as I have not had a post in quite sometime. Oh, how I wish that there were more hours in the day, but sadly there are not.  Thankfully I was inspired recently by our youngest to create an alligator/swamp birthday party so I can end this blogging drought.  He loves alligators and all things creepy, and absolutely loves The Wild Kratts...so naturally we had to create a swamp themed birthday party.  We had a Snake Egg Hunt, made swamp slime, created a reptile garden, and let the kids play in the backyard.  It was a perfect party in my book.

For the Snake Egg Hunt I was able to find some plastic Easter eggs after the holiday and spray painted them and then speckled them with acrylic paints.  The spray paint came out with a texture on some of the eggs which was completely not expected, but worked just fine for this project.


For the egg hunt I made little brown bags for the kids to decorate with some swamp (jungle) themed stamps our son had.  I printed their names on some cardstock for the handles...I have found it is always good to have everyone's things very well labeled...less likely to have any tears over misplaced items.  Not that I know this from experience.  :)


When having a swamp party there should definitely be some swamp slime!  We made our slime using the recipe from this blog...this recipe was perfect.  When adding the 4 ounces of water to the glue we just filled up the glue bottle, which was conveniently 4 ounces, and shook it and poured that into the bowl.  Super fun craft and I would say it was quite the hit.  We just packed it up in ziploc bags and sent it home with the boys.


We also made reptile gardens using glass candle holders from the dollar store, I just love the dollar store for party supplies!!!  The bottom layer is some river rocks from the dollar store, then some potting soil, a few chia seeds and a reptile of course. A perfect little reptile garden!


The alligator cake was absolutely adorable and I found my idea here, but truth be told...I will never be a professional cake decorator.  Anything that can go wrong with frosting will go wrong for me. Despite all of this the cake came out looking as it should despite a few mistakes here and there.  :)


There were also Chocolate Frog cupcakes.  I made the chocolate frogs using a candy mold that I found on Amazon and just placed them on top of the whipping cream frosting...super easy!


One of my favorite parts of this party were the party favors.  They were super fun to make and I hope all of the kids enjoyed them.  I know our little one has been enjoying his.  The favors included an Adventure Notebook which was found at the dollar store....surprise...surprise!  They were just perfect with the alligator/snake skin look.  I printed out labels and stuck them onto the notebooks. I included a pen to write in their notebooks.


There was an alligator brownie that I made using an alligator cookie cutter that I found on Amazon.


Our little adventure loving boy really loves these wish bracelets/necklaces that we made.  I found the adorable alligator charms on Etsy through the cutest little shop.  Absolutely loved the shop owner and loved the beads.  Just used some hemp twine and printed out the wish cards.  


There was also a  fruit roll-up, a bug container which held a little plastic lizard or frog, a nature scavenger hunt game which I found here.  I loved how these turned out and her printables were absolutely adorable!  I just printed them four to a page and used both of her designs to make them double sided.  We made the little Snake Egg labels for the TicTacs using a template from here.  I was quite pleased with how these turned out.


Here they are all wrapped up and ready to go home!


If you would like more ideas feel free to check out my Wild Kratt Birthday Party board on Pinterest.

This was a fun party to plan and enjoy with the boys.  While I do not love reptiles, I love how much our little creature lover does!  This was another super easy backyard party!  Hope you enjoyed stopping by! -Robyn

Monday, March 24, 2014

Art Gift Basket - Easter Basket

The weather is cold, but the sun is shining which makes me think of Spring.  It sure is taking it's sweet time coming to the Midwest this year.  All of this talk of Spring weather makes me think of Easter and all of the spring birthday's in our family.  This was a birthday gift for our nephew's 4th birthday, however it could very easily be given as an Easter basket to any little one who loves to be creative.  I purchased the plastic bucket at the dollar store and filled it up with all sorts of art supplies.


Items in the basket were:
  • Construction paper
  • Doodle paper
  • Coloring book
  • Crayola Paint Brush Pens
  • Markers
  • Crayons
  • Sidewalk chalk
  • Watercolor paints
  • Play-doh
  • Stickers
  • Glue
  • Glue sticks
  • Tape
  • Eraser
And a CapriSun for refreshments after all of that creating
Then I just arranged it all in the bucket/basket and wrapped it all up in clear cellophane (sorry I do not have a picture of it all wrapped up, but I think you get the idea).  Very easy and fun child's gift basket.


Thanks for stopping by to see what is new.
-Robyn

Monday, February 24, 2014

Cake Decorating Birthday Party

Choosing a theme for our daughter's twelfth birthday party was much easier than I had thought it might be.  I perused Pinterest for themes that she might like and let her choose from three.  She ultimately choose the cake decorating party, probably since this one scared me the most as I have almost zero experience with decorating cakes.  Well, as they say, no time like the present to learn something new.  I will admit that I was nervous to take on this party, but I am happy to say that I was pleasantly surprised.  
The girls were at a fabulous age for this party theme.
I choose to make each girl their own 5" round cake (they looked so darn cute).  I was very inspired by this blogger's cake decorating party.  I do not own small round cake pans, so I choose to bake 13"x9" cakes and use a round cookie cutter to cut out round cakes.  To make 12 cakes I had to bake 5 cake mixes, each 13"x9" cake yielded 5 cake rounds.  I used one cake on the bottom, and then cut one cake in half width wise and used a half cake for the top tier.  So each cake was 1 & 1/2 rounds.  


I had read that you can freeze cakes which makes them easier to frost.  I am sorry to say that this was not the case for me.  The cake still crumbled while we (my mother was so kind to come save me from the icing debacle that ensued) iced them.  While this did cause some panic, they still did turn out pretty cute.  So sorry that I do not have a picture of them frosted.

A friend was kind enough to share her recipe for cream cheese buttercream icing.  This was a fantastic icing which I will absolutely use again in the future.  I placed each cake on a Wilton 8" cardboard cake round that I found in the cake decorating aisle.  I iced the cake with white icing and then divided the rest in half.  One half was tinted light blue, which actually looked more like green (oh well) and the other half was pink.  I used the Wilton disposable icing bags with a decorator tip, there were a variety for the girls to experiment with.  I had seen a tip on Pinterest to use a  twist-tie to seal the tops which helped, but we still had many an icing explosion.  I would have loved to have been able to share photos of the decorating, but I was busy cleaning up icing and sadly was not able to snap any.  However, the girls were very talented, and the cakes looked amazing, much better than anything I could have created.  Every girl had a bakery box with their name on it to take their creation home to share with their family.  I created the labels in Word and just printed them out.  I thought that they needed a little finishing touch so I made some cupcake wrapper flowers to dress the boxes up a little.


After they were done decorating their cakes the girls voted on their favorites in three categories; Most Colorful, Best Design and Most Creative.  The winners were awarded a cupcake wrapper ribbon award. 


  As the girls were arriving to the party we played a Name that Cake game that I found on Etsy.  I altered them so that they were not for a bridal shower, but rather a birthday party.  Again, the girls amazed me at how many of these that they guessed correctly.  The winner took home a sock cupcake prize.

After the cake decorating the girls played Bingo for prizes. I photocopied Bingo cards and then used leftover scrapbook paper from the Happy Birthday Banner that I had made to make them party worthy.


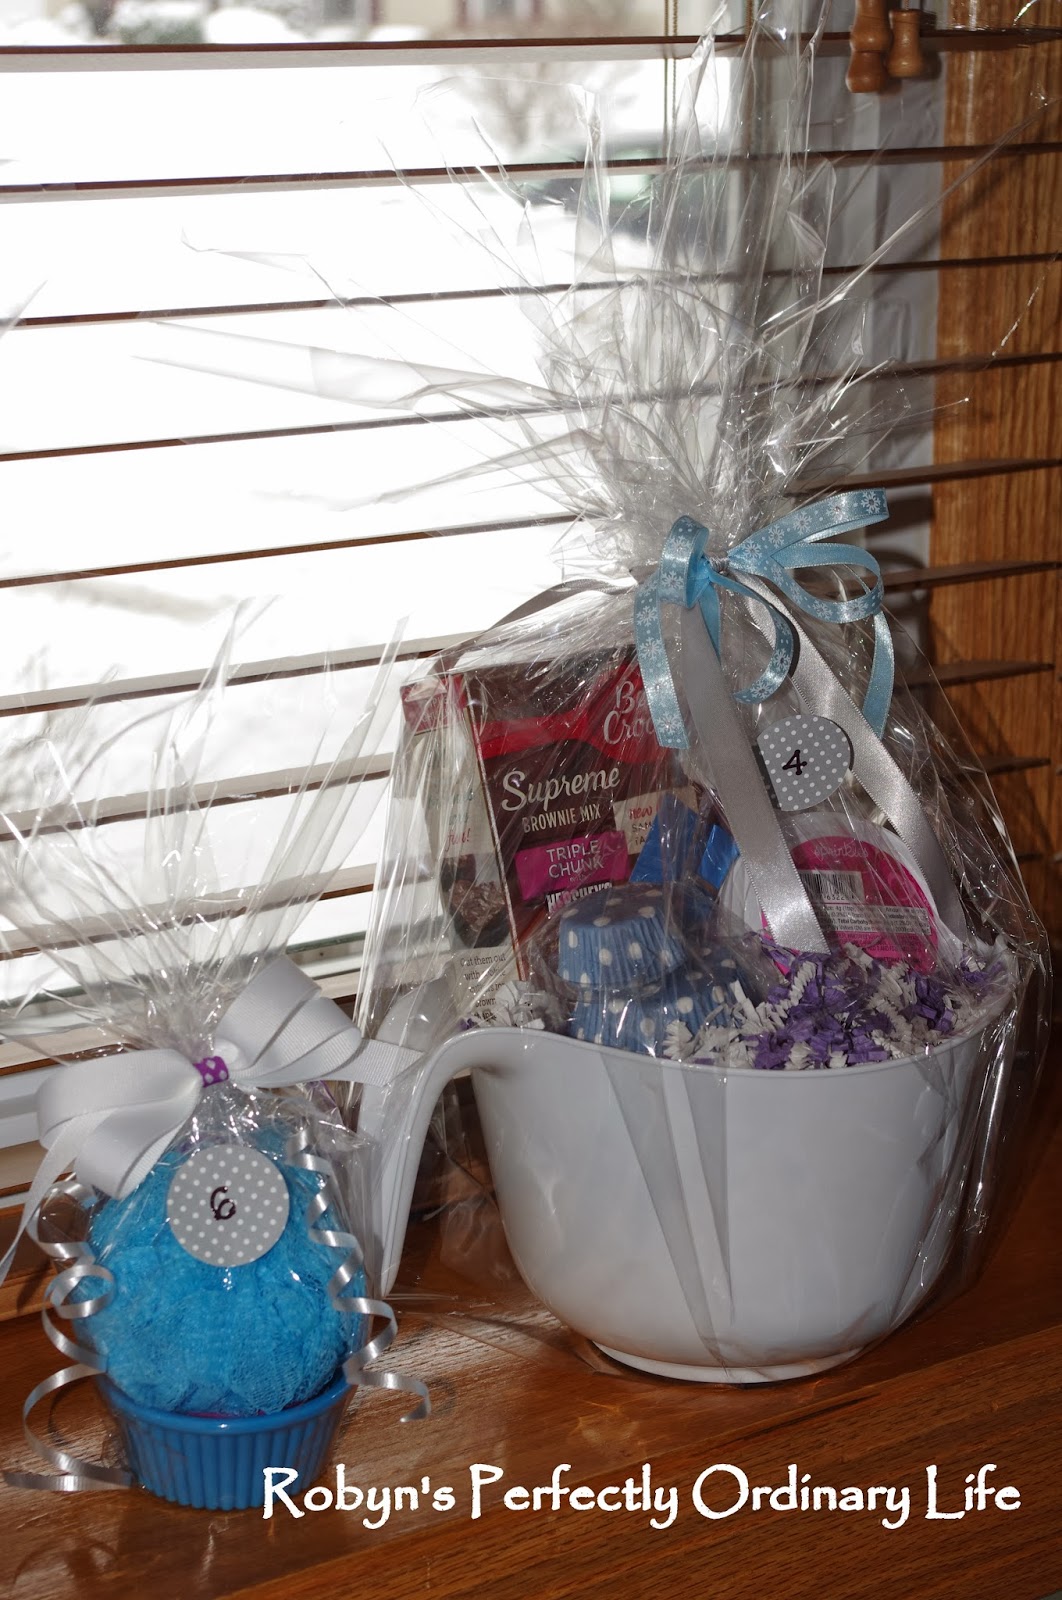
The Bingo prizes were baking themed and were made with baking bowls and utensils from the dollar store and baking mixes from the grocery store.  The girls were very excited to win a prize...the brownie bowl was the favorite.  To ensure no hurt feelings once a Bingo was called they drew a number and all the prizes were numbered with corresponding numbers.  If someone happened to wind Bingo more than once they could keep their prize or trade it in for another prize.


This basket included a mixing bowl, measuring cups, cupcake liners, sprinkles and a chocolate cake mix.


These were the cookie mixes with measuring spoons and a cookie cutter.


This was the brownie basket which included a mixing bowl, spatula, cupcake liners, sprinkles and of course a box of brownie mix.


There were two of the bath poof cupcake prizes.  The bottom is a ramekin dish, and the bath poof is topped off with a lollipop.


These were the numbers for the drawing of the prizes.

I choose to keep the food simple since the party was after lunchtime.  We served little finger sandwiches that were either turkey & cheese or ham & cheese and were marked with little washi tape flags.


Then we served a veggie tray with ranch veggie dip and hummus and crackers & cheese.  Then of course we served cupcakes.


For drinks we had pink lemonade and chocolate milk...the pink lemonade was the big winner.


Here is a shot of our dining room with the tables all set up.


I made a Happy Birthday Banner using the free printables from this site.  I have used her site in the past and love how they turn out every time.


I also made these adorable tulle pom poms using this tutorial and absolutely love them.  They were perfect hanging from our dining room light fixture.  They are now hanging in my daughters room as they were just too cute to put away.


Since they had a lot to bring home I decided to make some cute bags to take everything home in.  I found these on Pinterest and thought they would be easy enough to whip up.  Well, yes they are easy, but took forever to do since I am such a master procrastinator.  In the end I am thrilled that I made them, but they did take the most amount of my time.


We made simple little party favors for each of her guests using a pack of gum and trendy little hairbands that I made using this tutorial.


After the party was over there were a couple of left over cakes for the boys to decorate which I was able to snap a few pictures of.  As you can see the cakes were frosted in white and the decorator bags with the blue/green and pink frosting.  They loved decorating the cakes just as much as the girls, truly this is a wonderful idea for any age group, just depends on how much mess you can handle.


Thanks for sticking with me this long, as I know this is a long post.  Hope you enjoyed reading along.  This was one of my favorite parties and so happy our daughter enjoyed every part of it.


Cute DIY Tween Girl Gift Basket

I have to admit I absolutely love making gift baskets for any and all occasions.  So when my kids are invited to a party I ask them for ideas and then we create a basket that their friend will love.  The kids love helping to find just the right items to stick with theme of the gift basket.  My daughter wanted to create a crafting/girls night in gift basket for her friend.  We started off with a popcorn bucket for the container that we found at the dollar store.  I have to say that that is the best place to find a variety of containers that will not eat up the entire gift budget.  She picked out a few boxes of movie theater candies, microwave popcorn, rubber bands for making the loom bracelets, charms for the bracelets, and a monogram note pad with matching pen.


We then filled the popcorn tub with tissue and paper shreds for basket making . We arranged all of the goodies and wrapped the entire basket in cellophane and tied it up with ribbon.  She was thrilled to give her friend a gift basket with all of the fun things that she picked out for her. I think they look so cute all wrapped up in such a fun way.


Thanks again for stopping by.

Summer Vacation Countdown Calendar

Hello again,

Shamefully I have been away for too long with the holidays and kids parties.  The weather this winter in the Midwest has been something else so as you can well imagine we are counting down the days until spring.  The kids and I created a countdown chain to countdown to the last day of school and summer vacation.  We used leftover scrapbook paper to make our links, which we numbered in descending order until the last day of school.


We had to hang it in a place that was easy for the kids to access, but not so easy for our kitten to destroy...so we came up with the family room armoire.


The kids are so excited for their turns to cut off a link.  C'mon warmer weather.